This chapter will describe the basic functions/sequences needed to handle the basic functionality of the camera.
Ready to use-Examples are also shipped with the SDK in order to demonstrate the usage of the SDK regarding getting/setting features and acquiring images.
Initialization of the SDK
Before accessing any other functions of the SDK, an initialization needs to be done. Please refer to Init/Deinit -functions for the detailed description of the function csiInit.
After finishing the work with the SDK make sure to call the csiClose function. This makes sure that all memory is freed again, and all connections/interfaces are properly closed again.
Connecting to a camera
The use of the Chromasens Gen<I>CAM-SDK enables the user to use different transport layers and interfaces for the available devices.
Depending on the requirements for your application these transport layers can be selected during the device discovery process.
It is possible to use the standard search paths for the already installed transport layers.
These paths are set in the environmental variable “GENICAM_GENTL64_PATH” or for 32Bit-applications: “GENICAM_GENTL32_PATH” .
This is the default behavior. To reduce the time needed for the discovery process a specific path can be given. The search can also be limited to this single path when the overrideSearchPath is set.
To establish a connection, you will need to call 2 functions: csiDiscoverDevices and csiOpenDevice.
Getting and setting features
To configure the camera, so called features can be set and read by using the feature names provided by the device-xml-file. All features are of a specific type. The following different types exist:
Boolean
Integer
Floating point
String
Command
Register
Enumeration
For each type, a “Get”- and “Set”-function does exist in the API. For example, use csiGetFeatureFloat to get a float parameter. To retrieve additional information, the function csiGetFeatureParameter exists. This function will fill a csiFeatureParameter structure which provides information about the display name, minimum and maximum values, etc. This function is especially useful if you do not know the valid thresholds of a parameter.
Please be careful when treating string features. You must not exceed the maximum length! This can also be retrieved with the function csiGetFeatureParameter. The parameter maximumStringLength of the csiGetFeatureParameter structure will indicate the maximum string length to set in the feature.
If the complete list of the device features needs to be retrieved, it is recommended to use the function csiIterateFeatureTree . An example is shipped with the SDK to demonstrate the usage of it.
To set the values, please use the type-specific set-functions. For example, use csiSetFeatureInt for an integer value.
Acquiring images
To get images from the device, it must be opened first by calling the appropriate functions. The diagram below provides an overview of the functions which should be called during an acquisition process
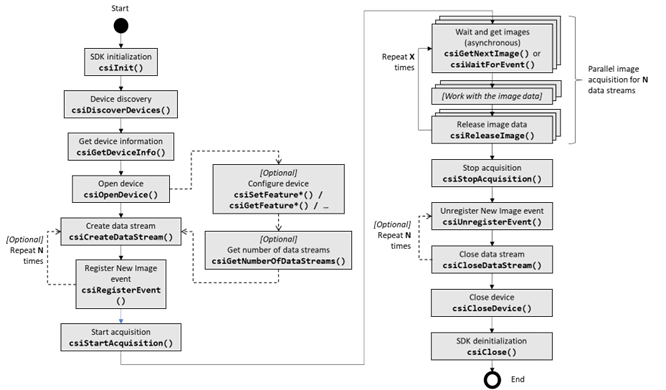
Image 1 overview_acquiring_process
Depending on the type of the device, it is possible to retrieve multiple data streams in parallel from the same device. This capability can be checked by using the csiGetNumberOfDataStreams function.
In general, two different ways of acquiring the images can be used:
1. Using Events (Events must be registered by the csiRegisterEvent function prior to the usage of the event.)
2. Directly calling the csiGetNextImage function
Independent of these two ways, the acquisition from the device must be started first by calling csiStartAcquisition. If enough images have been processed, this needs to be stopped again by calling csiStopAcquisition. After a received image is processed, it must be released back into the receive buffer of the acquisition engine by calling csiReleaseImage. Failing to do so will cause an error as soon as all receive buffers have been filled by the incoming data.
To grab images continuously, the processing part needs to keep up with the speed of the camera. Otherwise, images might be lost.